Fragment��ʹ��
�r�g��2018-09-21 ��Դ��δ֪
Fragment��ʹ��
�r�g��2018-09-21 ��Դ��δ֪
Fragment��Android��һ���dz���Ҫ��֪�R�����Ǻö�ͬ�W�s����Ϥ���߸�������������ʹ�ã������҂�Ԕ����Bһ������ʹ�ã�������Ҫ�v�����ăɷNʹ�÷���������ʹ�ú̈́ӑB(t��i)ע�ԡ��P(gu��n)��Fragment�cActivity֮�g��ͨ���Լ��������ڷ����҂��´����v�⡣
1.1 Fragment��ʹ��
1.1.1 Fragment�ĺ���ʹ��
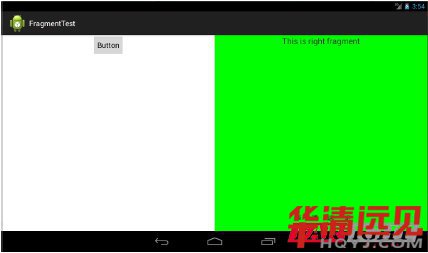
�@���҂��ʂ�һ�����ε�Fragment��ʾ������һ����������Ӄɂ�Fragment�����@�ɂ�Fragmentƽ��������ӿؼ��½�һ�����(c��)Fragment����left ragment.xml,���a������ʾ��
< LinearLayout xmlns : android =" http :// schemas . android .c
om/apk /res / android "
android : layout_width =" match_parent "
android : layout_height =" match_parent "
android : orientation =" vertical " >
<Button
android :id ="@+id/ button "
android : layout_width =" wrap_content "
android : layout_height =" wrap_content "
android : layout_gravity =" center_horizontal "
android : text =" Button "
/>��
</ LinearLayout >
�@�����ַdz����Σ�ֻ�Ƿ�����һ�����o������ˮƽ�����@ʾ��Ȼ���½��҂�(c��)��Ƭ����right fragment.xml,���a������ʾ��
< LinearLayout xmlns : android =" http :// schemas . android .c
om/apk /res / android "
android : layout_width =" match_parent "
android : layout_height =" match_parent "
android : background ="#00 ff00 "
android : orientation =" vertical " >
<TextView
android : layout_width =" wrap_content "
android : layout_height =" wrap_content "
android : layout_gravity =" center_horizontal "
android : textSize ="20 sp"
android : text =" This is right fragment "
/>
</ LinearLayout >
�@���҂�������һ��TextView�����@ʾ�ı����������ֱ����O(sh��)�óɾGɫ�����½�һ��LeftFragment����^����Fragment�����a���£�
public class LeftFragment extends Fragment {
@Override
public View onCreateView ( LayoutInflater inflater ,
ViewGroup container , Bundle savedInstanceState ) {
View view = inflater . inflate (R. layout . left_fragment ,
container , false );
return view ;
}
}
�@���،���Fragment��OnCreateView�����������{(di��o)��LayoutInater��inate()�����ф��Ŷ��x��left fragment���քӑB(t��i)�����M���������½�һ��RightFragment�����a���£�
public class RightFragment extends Fragment {
@Override
public View onCreateView ( LayoutInflater inflater ,
ViewGroup container , Bundle savedInstanceState ) {
View view = inflater . inflate (R. layout . right_fragment ,
container , false );
return view ;
}
}
���턓(chu��ng)��һ��FragmentTest�Ŀ������activity main.xml�Ĵ��a��������ʾ��
< LinearLayout xmlns : android =" http :// schemas . android .c
om/apk /res / android "
android : layout_width =" match_parent "
android : layout_height =" match_parent " >
<fragment
android :id ="@+id/ left_fragment "
android : name =" com . example . fragmenttest . LeftFragment "
android : layout_width ="0 dp"
android : layout_height =" match_parent "
android : layout_weight ="1" />
<fragment
android :id ="@+id/ right_fragment "
android : name =" com . example . fragmenttest . RightFragment "
android : layout_width ="0 dp"
android : layout_height =" match_parent "
android : layout_weight ="1" />��
</ LinearLayout >
���Կ������҂��ڲ����ļ���ʹ��<Fragment>
1.1.2 Fragment�ĄӑB(t��i)����
��һ��(ji��)���҂��ڲ����ļ����M����Fragment�����ӣ��@һ��(ji��)�҂��ڳ����\���^���афӑB(t��i)����Fragment������������҂����½�һ���Ŀ��������activity main.xml�ļ������a���£�
public class RightFragment extends Fragment {
@Override
public View onCreateView ( LayoutInflater inflater ,
ViewGroup container , Bundle savedInstanceState ) {
View view = inflater . inflate (R. layout . right_fragment ,
container , false );
return view ;
}
}
���턓(chu��ng)��һ��FragmentTest�Ŀ������activity main.xml�Ĵ��a��������ʾ��
< LinearLayout xmlns : android =" http :// schemas . android .com /apk /res / android "
xmlns : tools =" http :// schemas . android .com/ tools "
android : layout_width =" match_parent "
android : layout_height =" match_parent "
android : paddingBottom =" @dimen / activity_vertical_margin "
android : paddingLeft =" @dimen / activity_horizontal_margin "
android : paddingRight =" @dimen / activity_horizontal_margin "
android : paddingTop =" @dimen / activity_vertical_margin "
tools : context =". MainActivity "
android : orientation =" horizontal " >
< LinearLayout
android : layout_width =" wrap_content "
android : layout_height =" match_parent "
android : orientation =" vertical ">����
<Button
android :id ="@+id/bt1 "
android : layout_width =" wrap_content "
android : layout_height =" wrap_content "
android : text =" fargment01 "/>��
<Button
android :id ="@+id/bt2 "
android : layout_width =" wrap_content "
android : layout_height =" wrap_content "
android : text =" fragment02 "/>��
<Button
android :id ="@+id/bt3 "
android : layout_width =" wrap_content "
android : layout_height =" wrap_content "
android : text =" fragment03 "/>��
</ LinearLayout >
<FrameLayout
android :id ="@+id/fl"
android : layout_width =" match_parent "
android : layout_height =" match_parent "
>��
</ FrameLayout >
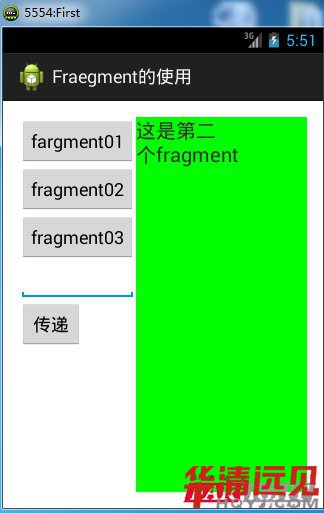
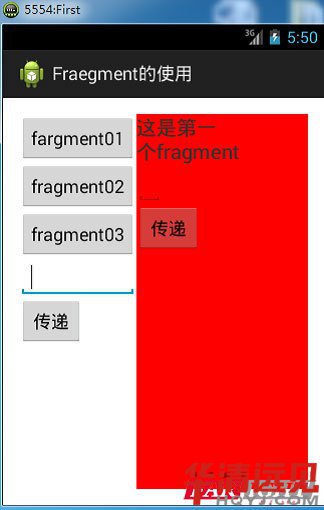
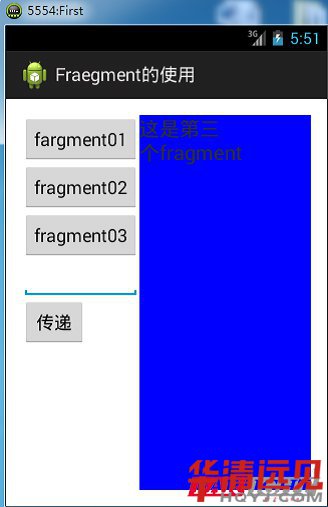
</ LinearLayout >�@���҂��҂��O(sh��)���˻�ӽ��棬��߅�������o�Qֱ���У���߅��һ��FrameLayout�����@ʾFragment�����҂��c����ͬ�İ��o����߅�ГQ��ͬ��Fragment�������҂���(chu��ng)��������ͬ��Fragment��քe�O(sh��)�������IJ��֣����a���£�
public class Fragment01 extends Fragment {
@Override
public View onCreateView ( LayoutInflater inflater , ViewGroup container ,
Bundle savedInstanceState ) {
View v = inflater . inflate (R. layout . fragment01 , null );
return v;
}��
<?xml version ="1.0" encoding =" utf -8"? >
< LinearLayout xmlns : android =" http :// schemas . android .com /apk /res / android "
android : layout_width =" match_parent "
android : layout_height =" match_parent "
android : orientation =" vertical "
android : background ="# ff0000 ">��
<TextView
android : layout_width =" wrap_content "
android : layout_height =" wrap_content "
android : text�@�ǵ�һ��=" fragment "
android : textSize ="20 sp "/>
<EditText
android :id ="@+id/ et_frag "
android : layout_width =" wrap_content "
android : layout_height =" wrap_content "/>
</ LinearLayout >
public class Fragment02 extends Fragment {
@Override
public View onCreateView ( LayoutInflater inflater , ViewGroup container ,
Bundle savedInstanceState ) {
// TODO Auto - generated method stub
View v = inflater . inflate (R. layout . fragment02 , null );
- 4 -
return v;
}
}����
<?xml version ="1.0" encoding =" utf -8"? >
< LinearLayout xmlns : android =" http :// schemas . android .com /apk /res / android "
android : layout_width =" match_parent "
android : layout_height =" match_parent "
android : orientation =" vertical "
android : background ="#00 ff00 ">��
<TextView
android : layout_width =" wrap_content "
android : layout_height =" wrap_content "
android : text�@�ǵڶ���=" fragment "
android : textSize ="20 sp "/>��
</ LinearLayout >
public class Fragment03 extends Fragment {
private TextView tv;
@Override
public View onCreateView ( LayoutInflater inflater , ViewGroup container ,
Bundle savedInstanceState ) {
// TODO Auto - generated method stub
View v = inflater . inflate (R. layout . fragment03 , null );
return v;
}����
<?xml version ="1.0" encoding =" utf -8"? >
< LinearLayout xmlns : android =" http :// schemas . android .com /apk /res / android "
android : layout_width =" match_parent "
android : layout_height =" match_parent "
android : orientation =" vertical "
android : background ="#0000 ff" >��
<TextView
android : layout_width =" wrap_content "
android : layout_height =" wrap_content "
android : text�@�ǵ�����=" fragment "
android : textSize ="20 sp "/>����
</ LinearLayout >
�ӑB(t��i)������Ƭ��Ҫ�֞�5����
1. ��(chu��ng)�������ӵ���Ƭ������
2.�@ȡ��FragmentManager���ڻ���п���ֱ���{(di��o)��getFragmentManager()�����õ���
3. �_��һ����(w��)��ͨ�^�{(di��o)��beginTransaction()�����_����
4. ��������(n��i)������Ƭ��һ��ʹ��replace()�������F(xi��n)����Ҫ����������id�ʹ����ӵ���Ƭ������
5. �ύ��(w��)���{(di��o)��commit()��������ɡ�
������������О鰴�o�O(sh��)���c���O(ji��n) �¼������҂��c�����o���F(xi��n)Fragment���ГQ�����a���£�
public class MainActivity extends Activity {
private Fragment03 fg3 ;
@Override
protected void onCreate ( Bundle savedInstanceState ) {
super . onCreate ( savedInstanceState );
setContentView (R. layout . activity_main );
Button bt1 = ( Button ) findViewById (R.id.bt1 );
Button bt2 = ( Button ) findViewById (R.id.bt2 );
Button bt3 = ( Button ) findViewById (R.id.bt3 );
Fragment01 fg1 = new Fragment01 ();
FragmentManager fm = getFragmentManager ();
FragmentTransaction ft = fm. beginTransaction ();
ft. replace (R.id.fl , fg1 );
ft. commit ();
bt1. setOnClickListener (new OnClickListener () {
@Override
public void onClick ( View v) {
TODO Auto - generated method stub
Fragment01 fg1 = new Fragment01 ();
FragmentManager fm = getFragmentManager ();
FragmentTransaction ft = fm. beginTransaction ();
ft. replace (R.id.fl , fg1 );
ft. commit ();
}
});
bt2. setOnClickListener (new OnClickListener () {
@Override
public void onClick ( View v) {
TODO Auto - generated method stub
Fragment02 fg2 = new Fragment02 ();
FragmentManager fm = getFragmentManager ();
FragmentTransaction ft = fm. beginTransaction ();
ft. replace (R.id.fl , fg2 );
ft. commit ();
}
});
bt3. setOnClickListener (new OnClickListener () {
@Override
public void onClick ( View v) {
fg3 = new Fragment03 ();
FragmentManager fm = getFragmentManager ();
FragmentTransaction ft = fm. beginTransaction ();
ft. replace (R.id.fl , fg3 );
ft. commit ();
}
});
}
�@�Ӿ�������ڻ���ЄӑB(t��i)����Fragment�Ĺ��ܣ��\�г��քe�c�����o�����ڲ�ͬ��Fragment֮�g�ГQ

 �A���hҊ90+�Ŀ�@����������2021���
f(xi��)ͬ�����Ŀ���A���hҊ�s�@2021�vӍ��������ȿڱ�Ӱ����I(y��)����Ʒ�A���hҊ��������2021����h���k��У��Ϣ�W�ƺ���(li��n)����ůͬ�й���(chu��ng)�ѿ� 2019�A���hҊ��������������ع�������УAI�˹����܌W�ƽ��O(sh��) �A���hҊ�˹������Y���A���hҊ���������Ĵ�ʡ��(li��n)�W(w��ng)������s�@��(y��u)����I(y��)����
�A���hҊ90+�Ŀ�@����������2021���
f(xi��)ͬ�����Ŀ���A���hҊ�s�@2021�vӍ��������ȿڱ�Ӱ����I(y��)����Ʒ�A���hҊ��������2021����h���k��У��Ϣ�W�ƺ���(li��n)����ůͬ�й���(chu��ng)�ѿ� 2019�A���hҊ��������������ع�������УAI�˹����܌W�ƽ��O(sh��) �A���hҊ�˹������Y���A���hҊ���������Ĵ�ʡ��(li��n)�W(w��ng)������s�@��(y��u)����I(y��)����